Ever wondered what makes a surfboard glide, turn, or catch waves with such apparent ease? It’s far more than just a plank of foam. Each curve, contour, and component of a surfboard is meticulously designed. Understanding these elements unlocks a deeper appreciation for the craft and how your board performs.
Unpacking the anatomy of your surfboard is crucial for optimizing your surfing experience. From the moment you paddle out to dropping into a perfect barrel, every part plays a vital role. Knowing how these components interact empowers you to choose the right board for your style and the conditions.
This article will break down the key parts of a surfboard, explaining their function and impact. Whether you’re a beginner struggling with pop-ups or an experienced rider seeking to refine your turns, this knowledge is invaluable. Get ready to dive deep into the fascinating world of surfboard design.
At Surfboards in Cabo, we believe in equipping surfers with the knowledge to make informed choices. Our range of Custom-made surfboards in Cabo are crafted with precision, considering every anatomical detail. Let’s explore the fundamental components that dictate your ride.
The Nose: Leading the Charge
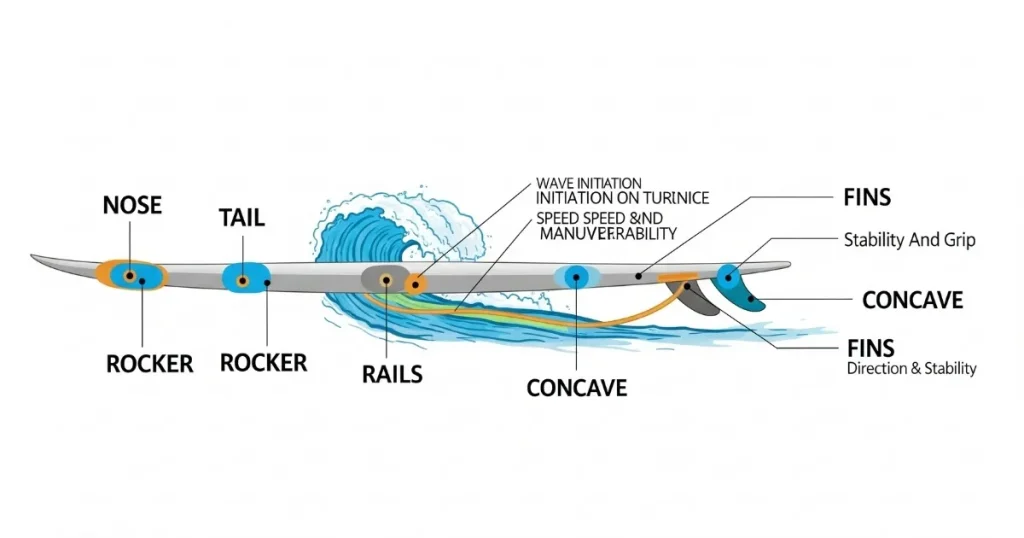
The nose is the very front tip of your surfboard, a crucial design element. Its shape significantly influences how the board catches waves. A wider, rounder nose generally offers more buoyancy and paddling power, making it easier to get into waves.
Conversely, a more pointed or narrow nose reduces swing weight, allowing for quicker turns and more radical maneuvers. This design is often favored by high-performance shortboards. The nose essentially dictates the board’s entry into the wave.
For longboarders, a wider nose provides stability and a larger platform for nose riding. This classic maneuver relies heavily on the board’s ability to maintain trim while the rider is perched at the very front. It’s all about balancing buoyancy.
The rocker of the nose also plays a role. A flatter nose rocker can help with early wave entry, but too flat, and it might “pearl” or dig into the water. The ideal nose shape balances paddle power with maneuverability and stability.
The Tail: Steering Your Course
The tail is the back end of your surfboard and is fundamental to control and turning. Different tail shapes offer distinct performance characteristics. A wider tail provides more lift and stability, especially in smaller, weaker waves.
A narrow tail, on the other hand, allows for quicker rail-to-rail transitions and tighter turns. This is often seen on performance shortboards designed for powerful waves. The tail essentially acts as the board’s rudder.
Common tail shapes include the squash, swallow, pin, and round tails, each with unique advantages. A squash tail is versatile, offering a good balance of speed and maneuverability. Swallows provide bite and drive.
Pin tails are excellent for control in hollow, powerful waves, allowing the board to hold a line. Round tails offer smooth, continuous turns. The choice of tail profoundly impacts how your board carves and responds.
The Rocker: The Board’s Curve
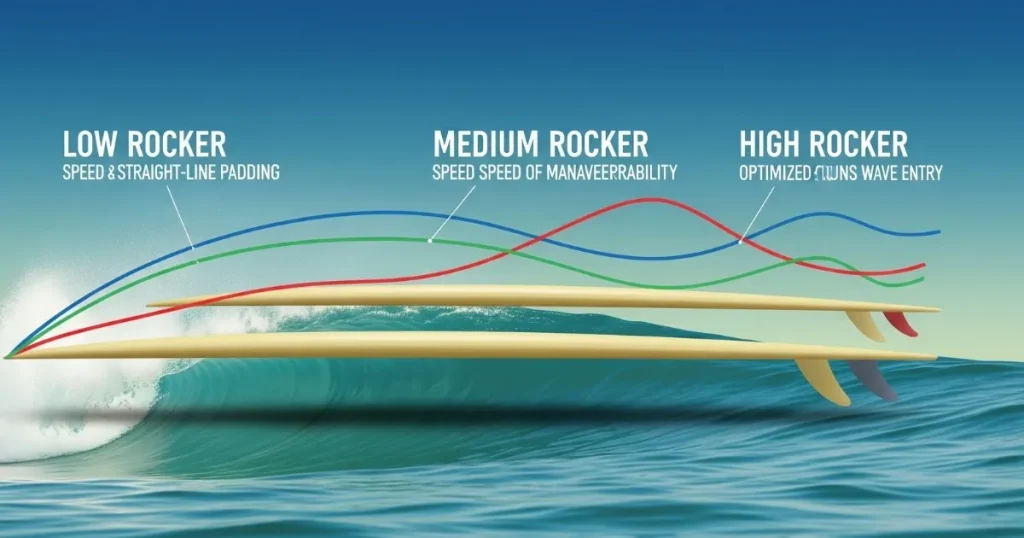
The rocker refers to the longitudinal curve of the surfboard from nose to tail. It’s a critical design element that greatly impacts speed, maneuverability, and wave entry. A flatter rocker increases speed and paddle power.
However, too little rocker can make the board harder to turn and prone to pearling. This is often seen in high-volume boards designed for cruising. The rocker needs to be finely tuned for optimal performance.
More rocker, meaning a greater curve, enhances maneuverability and allows for tighter turns. This is common in boards designed for steep, critical waves. It helps prevent the nose from digging in.
The rocker is often broken down into nose rocker and tail rocker. A continuous curve or varying degrees of curve along the length of the board dramatically alters its feel and response on the wave face.
The Rails: Edges of Engagement
The rails are the edges of the surfboard, running from nose to tail. They are crucial for engaging with the wave and initiating turns. The shape and volume of the rails significantly influence how the board carves.
Thicker, fuller rails generally provide more buoyancy and stability, making the board more forgiving. They are often found on beginner boards and longboards. They make it easier to maintain balance.
Thinner, more tapered rails offer greater sensitivity and allow for more aggressive turns. These are typical on performance shortboards, enabling the surfer to dig the rail deep into the wave face.
The rail’s apex, or the point where it’s thickest, also matters. A higher apex provides more volume, while a lower apex allows for quicker rail-to-rail transitions. The rail is your connection to the wave.
Soft rails are more forgiving, while hard rails offer more drive and speed. Understanding rail design is key to unlocking advanced maneuvers and feeling connected to the water.
The Concave and Channels: Hydrodynamic Prowess
Concaves are subtle depressions or channels on the bottom of the surfboard. They are designed to manipulate water flow, generating lift and speed. Single concaves are common, running down the center of the board.
A single concave can help channel water, creating lift and making the board faster. This is often found under the front foot for drive. They are crucial for maintaining speed through flat sections.
Double concaves often appear under the back foot, allowing for easier rail-to-rail transitions and release. They split the water flow, providing a “release” point for turns. This adds maneuverability.
Channels are more pronounced grooves on the bottom of the board, offering even more directed water flow and lift. They are less common but can be found on specialized boards for added speed and drive.
The combination of concaves and channels is meticulously crafted to optimize the board’s interaction with water, providing speed, lift, and control. It’s all about hydrodynamics.
The Fins: Driving and Directing
Fins are arguably the most impactful single component on a surfboard’s performance. They provide drive, hold, and direction. Without fins, a surfboard would be virtually unmanageable, just sliding.
The number of fins (single, twin, thruster, quad) and their size, shape, and placement dramatically alter the ride. A single fin provides classic drive and hold, often seen on longboards.
Twin fins are loose and fast, offering a playful feel. The thruster setup (three fins) is the most popular, offering a balance of drive, control, and maneuverability, making it highly versatile.
Quad fins provide speed and hold, particularly in barrel riding. The flex of the fins also plays a role, with stiffer fins offering more drive and looser fins providing more release.
Fin cant (angle), toe (inward angle), and foil (cross-sectional shape) all contribute to the fin’s performance. Choosing the right fin setup for your board and conditions is paramount to a great ride.
Conclusion: Crafting Your Perfect Ride
Understanding the anatomy of a surfboard empowers you to make informed decisions and truly feel the nuances of your ride. Each part, from the nose to the fins, plays a vital role in your surfing experience. It’s a complex interplay of design and physics.
At Surfboards in Cabo, we’re passionate about helping you find or create your ideal board. Our expertise in Custom-made surfboards in Cabo ensures that every detail is considered, from the rocker to the fin setup. We’re here to guide you.
The next time you paddle out, take a moment to appreciate the intricate design beneath your feet. Knowing how each part contributes to your performance will deepen your connection to the ocean and your craft. Enjoy the ride!