Your surfboard is more than just a piece of equipment; it’s your ticket to endless waves and unforgettable memories. But let’s face it, even the most cherished boards take a beating. From accidental drops to run-ins with rocks or other surfers, dings are an inevitable part of the surfing lifestyle. The good news is that most of them are a simple fix.
Ignoring a ding is a big mistake. Water can seep into the foam core, causing it to delaminate and weaken the board over time. This can seriously compromise its performance and lifespan. The key to keeping your board in top condition is to address these issues promptly, and often, you can do it yourself.
Learning how to repair your dings is an essential skill for any dedicated surfer. Not only does it save you money on professional repairs, but it also gives you a deeper connection to your board. It’s a satisfying feeling to bring your trusty steed back to life with your own two hands.
This guide will walk you through the process, from identifying the damage to performing a successful repair. We’ll cover the most common types of dings, the tools you’ll need, and the step-by-step instructions to get your board back in the water, looking as good as new.
Identifying the Damage: Not All Dings Are Created Equal

Before you start a repair, you need to properly assess the damage. Dings can range from small surface scratches to deep punctures that expose the foam core. A light touch and a careful visual inspection will help you determine the severity and the best course of action.
A minor cosmetic ding is often just a scratch in the fiberglass layer. If the ding doesn’t go through to the foam, it might not even need a full repair, but it’s still a good idea to seal it to prevent any future issues. These are the simplest to fix.
A more serious ding involves a crack or a puncture that has breached the fiberglass and exposed the foam. This is a critical situation that needs immediate attention. Water will get in, and the longer you wait, the worse the problem becomes.
The most severe damage is a “crease” or a “buckle,” where the board has been bent and the fiberglass is compromised along a significant portion. These are often difficult to repair yourself and are best left to a professional board repair service.
Gathering Your Gear: What You’ll Need for a Successful Repair
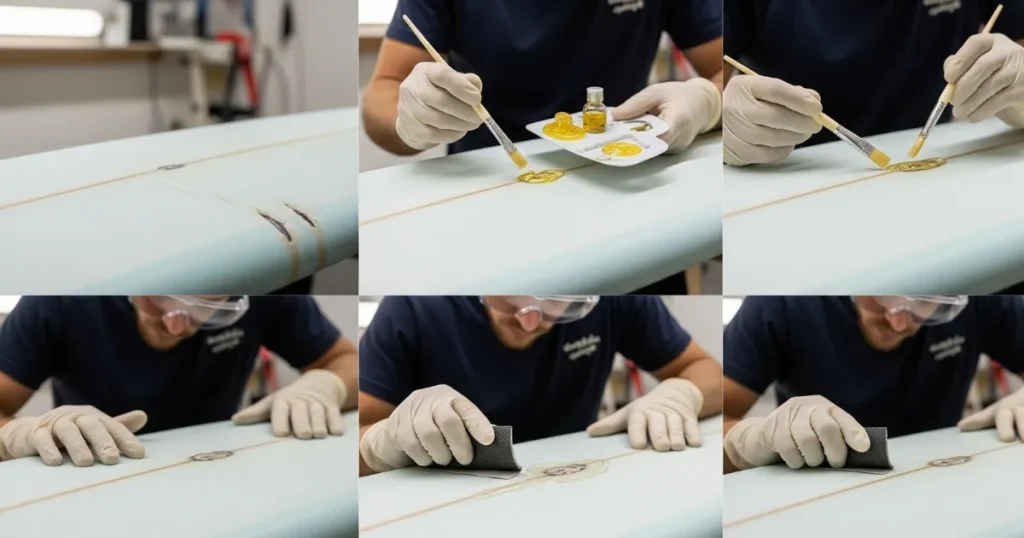
Having the right tools is the first step to learning how to repair your dings. Don’t worry; you don’t need a professional workshop. A basic Ding repair kits is all you’ll need for most repairs. These kits are often available at your local surf shop.
A typical repair kit will include a resin mixture (epoxy or polyester), a catalyst, fiberglass cloth, sandpaper of varying grits, and a mixing stick. You might also need a razor blade, some masking tape, and a small container for mixing.
If you’re in a pinch in Cabo, you can find a kit to repair dings in Cabo at our shop. We’ll make sure you have everything you need to get the job done right. A quality kit is worth its weight in gold.
You’ll also want to have some acetone or rubbing alcohol on hand to clean the area before you start. This ensures that the resin adheres properly and gives you a strong, lasting repair. A clean surface is a crucial part of the process.
A Step-by-Step Guide to Fixing a Basic Ding
First, make sure the board is completely dry. Any moisture in the foam will compromise the repair. You can leave it out in the sun for a few hours, but be careful not to let the resin cure too quickly.
Next, clean the area around the ding. Use a razor blade to carefully remove any loose or delaminated fiberglass. Then, use acetone to wipe away any wax or grime. This is a critical step in how to repair your dings effectively.
Mix your resin according to the kit’s instructions. A little goes a long way, so don’t overdo it. Apply the resin to the ding, filling it completely. If the ding is deep, you may need to apply a small piece of fiberglass cloth.
Once the resin is applied, let it cure completely. This can take anywhere from a few hours to a full day, depending on the type of resin and the temperature. Once it’s hard, sand the area smooth with progressively finer sandpaper.
When to Call a Pro: Knowing Your Limits
While most dings are manageable, some damage is beyond the scope of a DIY repair. If you have a major buckle, a deep crease, or a broken fin box, it’s time to call in the experts. A professional repair will be stronger and more reliable.
Professionals have access to specialized tools and materials that ensure a perfect match to your board’s original construction. They can perform intricate repairs and even offer a full glassing service to restore your board’s structural integrity.
In Cabo, we have trusted repair professionals who can handle any job, big or small. Don’t risk a botched DIY repair on a board you love. Sometimes, the smart choice is to get professional help and have peace of mind.
A badly repaired ding can cause more problems down the line. It can create a weak spot that will eventually break again, or it can cause water to continue to seep into the foam. Invest in a professional repair for the longevity of your board.
Final Thoughts on Ding Repair and Board Care
Learning how to repair your dings is a valuable skill that will save you time and money. It’s a rewarding experience that keeps your board in pristine condition and extends its life. So, the next time you get a ding, don’t fret; just grab your kit.
Remember to always inspect your board before and after each session. Catching a small ding early can prevent it from becoming a big problem. A little proactive maintenance goes a long way in keeping your board and your stoke alive.
By taking care of your board, you’re not just preserving a piece of equipment; you’re protecting your investment in fun and adventure. A well-maintained board is a happy board, and a happy board means more waves and more smiles.
So, get out there, catch some waves, and when a ding happens, you’ll be ready. Your board will thank you for it, and you’ll have the satisfaction of knowing you can keep your trusted companion ready for whatever the ocean throws at you.